
Shadows are the best way if you want to give your images an additional depth and three-dimensional look. It can be used to emphasize the mood of the image or specific features, which takes the image’s overall quality to the next level. But how do we do that? How to make a shadow in Illustrator?
Well, in this article, we will discuss the same. Here, we will provide a complete step-by-step process to enhance your images by simply adding a shadow to them.
How To Make a Shadow In Illustrator?
Here’s how you can add a drop shadow to the shape, texts, illustrations, or other objects and increase their depth and overall look.
Step 1 – Open the Illustrator on your computer and open the image you want to edit.
Step 2 – Click on the object you want to add shadow to.
Step 3 – On the top of the screen, you will see a horizontal toolbar with various options. Click on Effects.
Step 4 – A drop-down menu will appear, select Stylize. Please remember that there will be two Stylize options available, and you have to choose the one under the heading of Illustrator Effects.
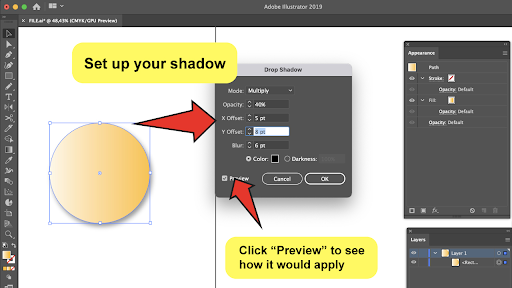
Step 5 – A pop-out menu will appear, select Drop Shadow.
That’s it. You have successfully added shadows to your desired objects.
How To Make Changes To The Shadow Of Your Object?
Now, you know how to make shadows in Illustrator. But what if you don’t like the shadow and want to make some changes to it? It is possible.
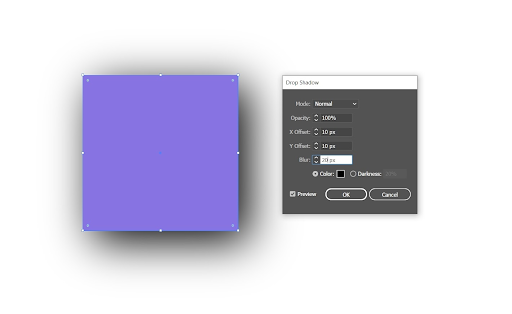
The Illustrator application provides you with various options to make a variety of changes to the shadow and make it as per your preference. Along with the shadow, you will get to see a dialogue box that consists of the features that allow you to change the shadow of your object. Here are some of them:
- Mode – This option will help you blend the shadow of the object. It will be set to Multiply by default, but you are free to experiment and see what works best for you. It will have options like Normal, Darken, Multiply, Color Burn, Lighten, Screen and more that you can try.
- Opacity – You can also adjust the percentage of the opacity. The general rule of thumb is that the higher the percentage, the better the shadow.
- X and Y Offsets – These options determine how far the object’s shadow will offset. X offset will help shift the shadow from left to right. And the Y offset will help you shift the shadow from upside down. Try it out and see what fits your image best.
- Blur – Increasing blur will make the shadow look larger. On the other hand, decreasing the blur will make the shadow smaller. Keep it at a level that works fine for you.
- Color – You can also change the color of the shadow. In general, the shadow is set to black color. If you opt for any other color, make sure it suits the background of the image.
- Darkness – If you select Darkness, a percentage will appear next to it. It is there to help you determine how much blackness you need in the shadow of the object.
Once you are done making changes to the shadow, press OK to implement all of them. Don’t click on cancel, as the shadow will remain unchanged.
Conclusion
We hope that you have got the answer to your query about how to make a shadow in Illustrator. It is not rocket science but a matter of only a few simple steps. Once you add shadow to your image, you can customize it according to your needs using the dialogue box of the shadow, which allows you to change mode, color, Opacity, X and Y offset and more.